Daily Check Machine
May 12, 2021
Duration: 7 days
Material:
- HDMI 4 Pi: 5" Display w/Touch and Mini Driver - 800x480 HDMI
- USB speaker
- Stereo Enclosed Speaker Set - 3W 4 Ohm, not used in the end
- OLED screen
- High accuracy temperature sensor
- Clear bricks
- Red LED button
- Green LED button
Install web browser
Reference: Installing the Chromium Web Browser on a Raspberry Pi
pi@ixe00:~ $ sudo apt update
pi@ixe00:~ $ sudo apt full-upgrade
pi@ixe00:~ $ sudo apt install chromium-browser -y
pi@ixe00:~ $ sudo reboot
installed the Chromium Web Browser and reboot the pi, the icon of the browser appeared on my VNC desktop of pi.

Opened the browser and tried to play Youtube Video.

However the Stereo Enclosed Speaker Set - 3W 4 Ohm I plugged into the mini driver for the HDMI diplay doesn't work.

I think I need to change the audio output into USB speaker instead.

Install speaker
In order to make us hear again (being deaf from previous SPK plug in stero speaker), we need to update the ALSA config.
All we have to do is tell Raspbian to look at "card #1" for the default audio. Card #0 is the built in audio, so this is fairly straightforward.
Run sudo nano /usr/share/alsa/alsa.conf and look for the following two lines:
defaults.ctl.card 0
defaults.pcm.card 0
Change both “0” to “1” and then save the file. That’s it!

I found other usefull links to connect USB speaker to pi:Using a USB Audio Device with the Raspberry Pi. But I think above method is more straightforward and easy.
After testing, my speaker is finally working!
Write Main Daily Check program
I've searching some ways to let pi directly write into the HDMI connected screen. Our TA @Ilan Mandel said I could use pygame. I found another python toolkit to enable full screen on HDMI screen is tkinter, with example I found. After a few trials, I finally settled with pygame (but when I look back I think tkinter might be a better choice, because it's easier to work with buttons).
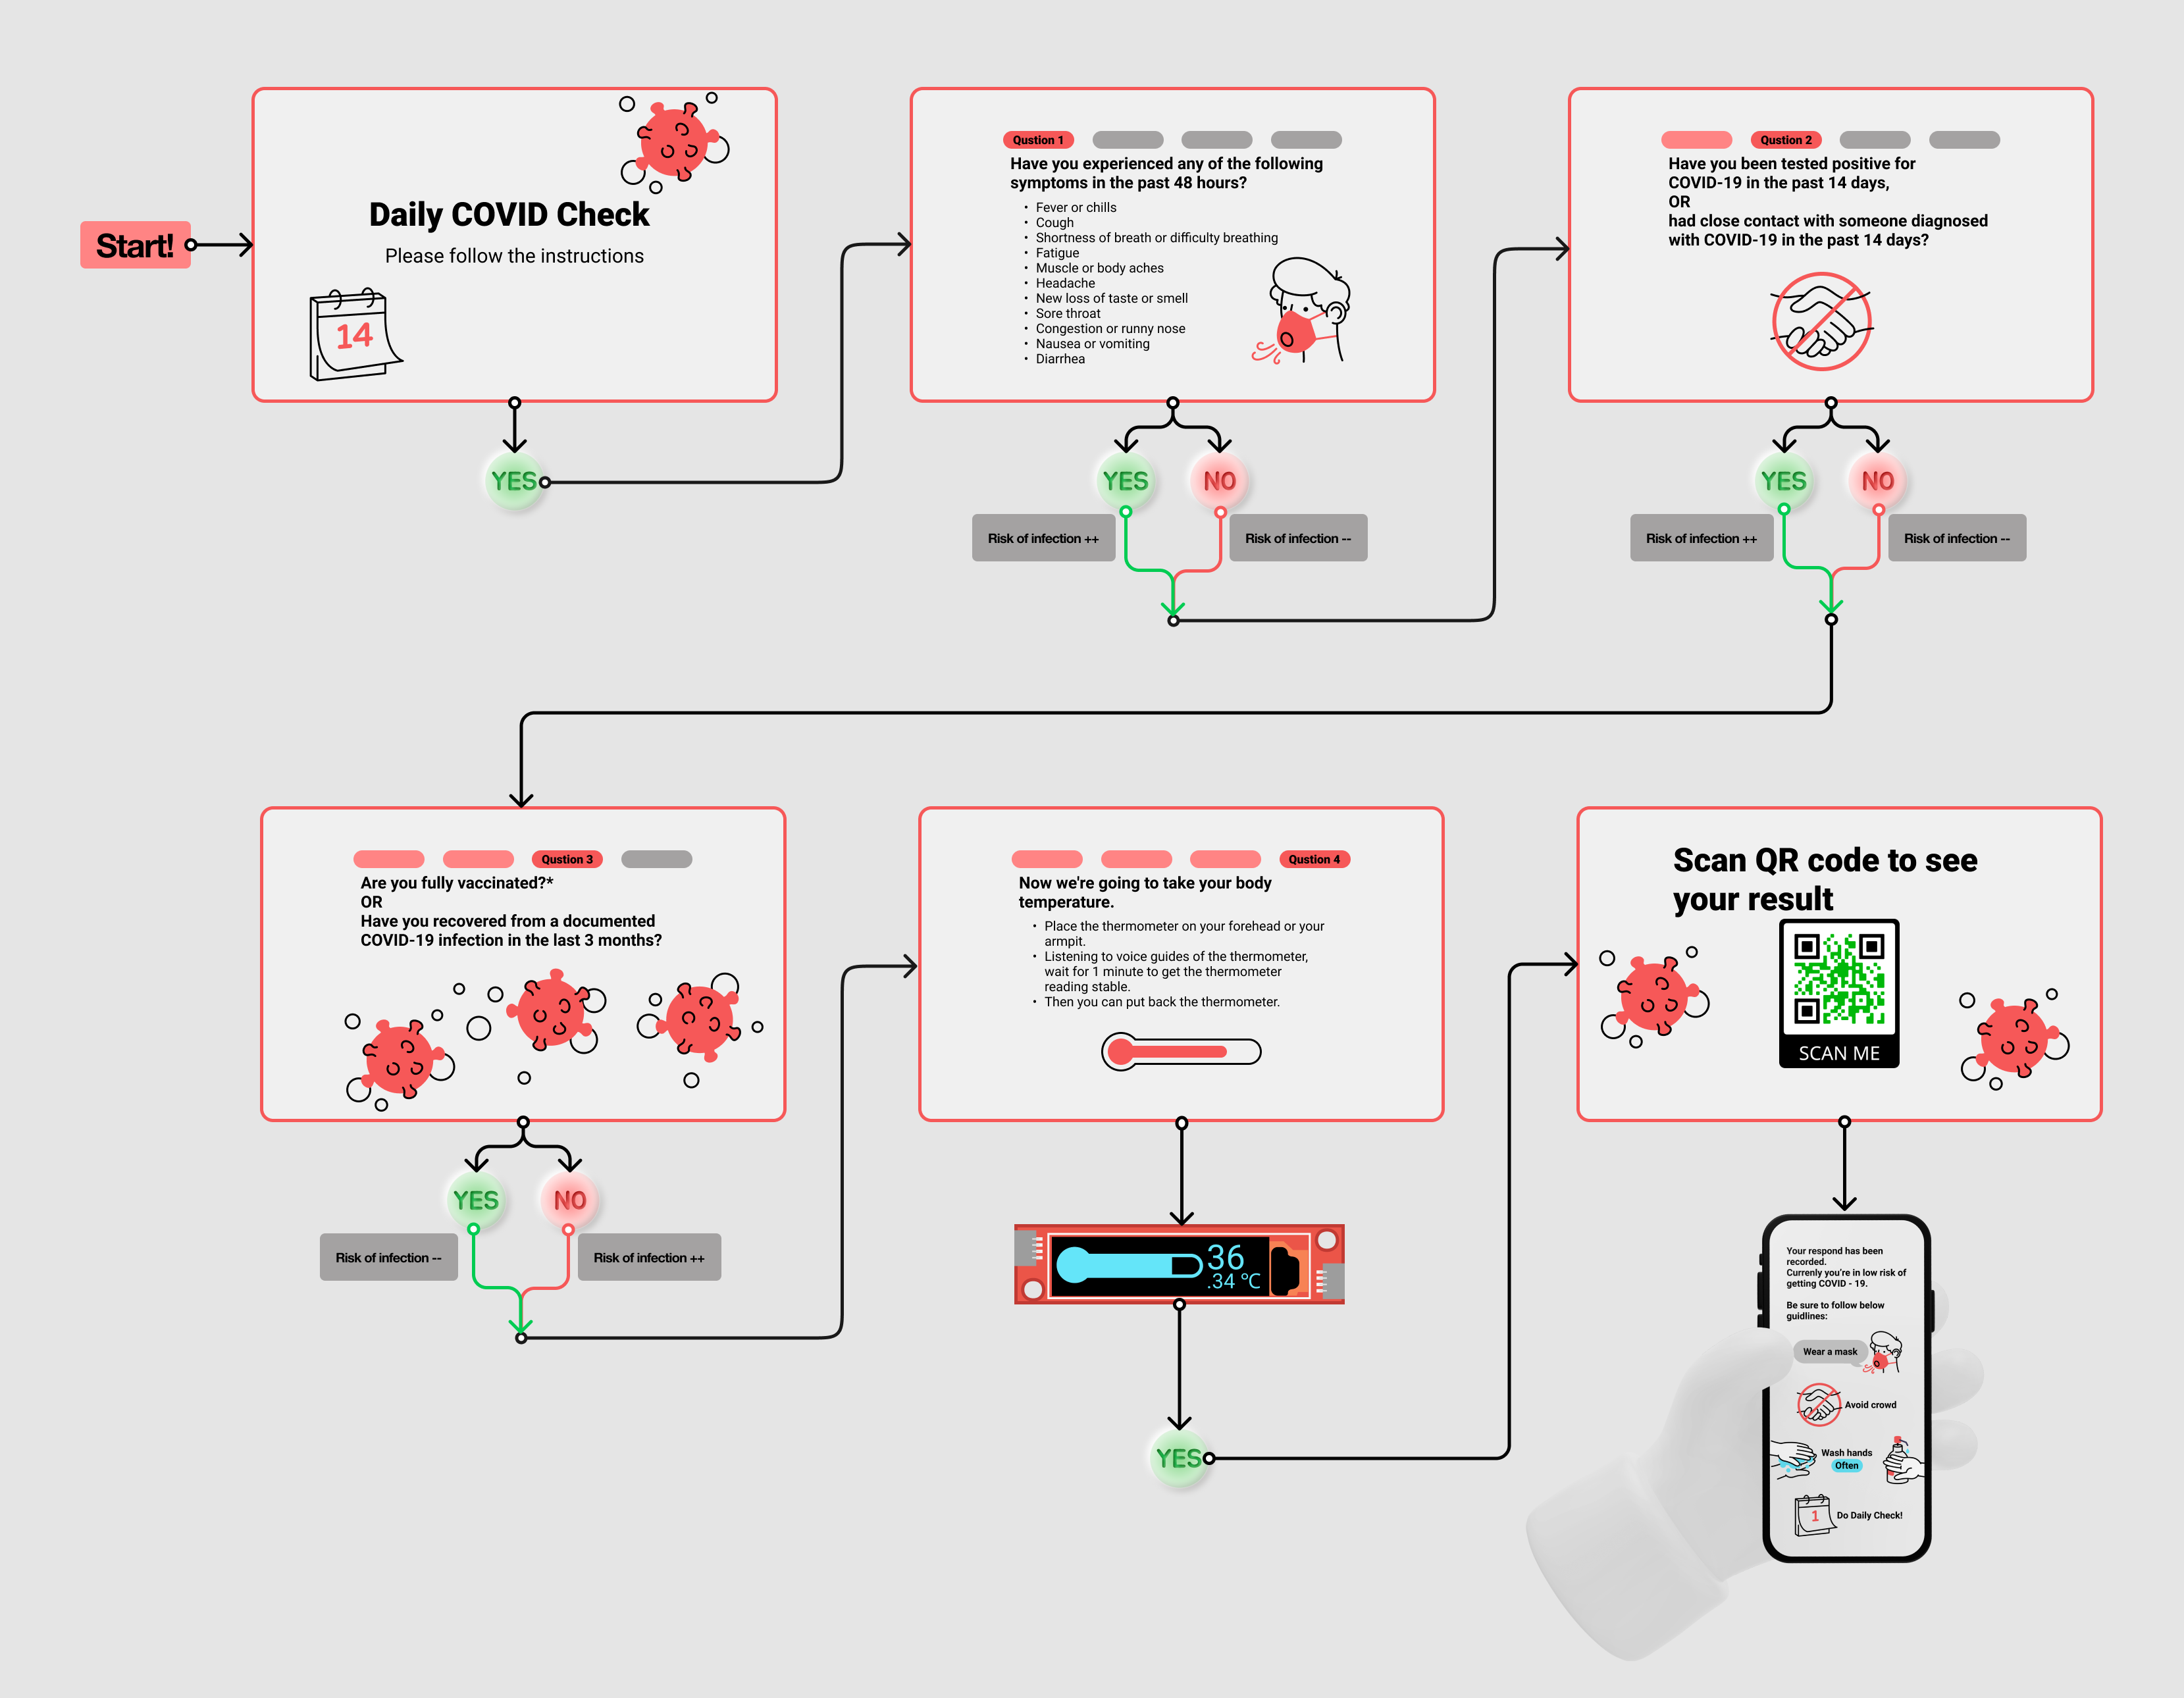
I used Figma to design the UI of the Daily Check Machine, exported the unclickable elements, and imported them as .png into the pygame file.
Below is the user flow and my UI design of the Daily Check Machine.

Here is my main portion pygame code
Design and implement OLED screen and thermometer
Below is my design of OLED display

I used online text-to-speech services to generate voice notification, which helps users to correct control the timing of the thermometer. In addition, I also added "bell-ring" sound. The temperature sensor takes time to get stable value (it's similar to the analog Mercury thermometer). I tested a few times, and find about 1 minutes is a good time range to let readings climbing from room temperature to body temperature.
Here is OLED code
Video of my friend using the Daily Check Machine for the first time
Reflections on process
- I think Tkinter would be better than pygame for this project. when implementing the quit button, the mouse click events is associated with an area of the canvas. When you need to change the position of the button, you need to change both the shapes of the button, but also the range of when to respond to click event.
- In the near future, we no longer needs the Daily Check any more, but the thermometer has already become a handy tool to me. When I got my second dose vaccine (right after the presentation), I got fever but I don't have a real thermometer. I ran the OLED.py and did get a convincing value (about 38 degrees Celsius, in fever range). At the same time, I realized that my rough tuning of the temperature sensor really worked. I added 3 degrees on the original reading from the temperature sensor (code I used for testing sensor), because I noticed the sensor cannot be placed very tight on human skin, and the body temperature reading was always about 3 degrees lower. I addition, I did see the advantage of infared thermometer for how fast it get the reading, but I also feels it's fun to play with my thermomether to see the analog mercury bar on the OLED screen going up and down.
- On this project, I spent almost an entire day searching for how to write a program that can be full screen on HDMI connected display and leaving less time on actually designing and coding. The planning of time is not wise, but I did learn a lot about pygame and tkinter. I also wrote a scratch program with tkinter and abandon it the next day. The entire process is stressful but also enjoyable.
for ev in pygame.event.get():
if ev.type == pygame.QUIT:
pygame.quit()
#checks if a mouse is clicked
if ev.type == pygame.MOUSEBUTTONDOWN:
#if the mouse is clicked on the button the game is terminated
# you need to change here
if left_padding <= mouse[0] <= left_padding+140 and 20 <= mouse[1] <= 20+40:
pygame.quit()

# You need to change here too!
if left_padding <= mouse[0] <= left_padding+140 and 20 <= mouse[1] <= 20+40:
pygame.draw.rect(screen,color_light,[left_padding,20,140,40])
else:
pygame.draw.rect(screen,color_dark,[left_padding,20,140,40])button = tk.Button(
text="Click me!",
width=25,
height=5,
bg="blue",
fg="yellow",
)